

Garbage Disposal Repair: A modern kitchen depends heavily on efficiency, and a garbage disposal plays a quiet but essential role in keeping things clean and convenient. However, when it suddenly stops working, makes strange noises, or starts leaking, the disruption can be frustrating. At that point, understanding garbage disposal repair becomes more than just helpful; it becomes necessary.
While many homeowners assume that any disposal issue requires professional help, the reality is quite different. In fact, a large number of common problems can be diagnosed and fixed with simple tools and a bit of guidance. Moreover, learning how the system works can prevent future breakdowns and save money over time.
This guide is designed to give you practical, real-world knowledge backed by proven troubleshooting methods. Instead of overwhelming you with technical jargon, it focuses on clear explanations, safe practices, and step-by-step insights. As a result, you will not only fix issues but also gain confidence in handling your kitchen equipment.
Understanding How a Garbage Disposal Works
Before jumping into repairs, it is important to understand what is happening inside the unit. After all, diagnosing a problem becomes much easier when you know how the system operates.
A garbage disposal is essentially a small grinding machine installed under your sink. When food waste enters the chamber, it is broken down into tiny particles that can pass safely through the plumbing system. However, contrary to popular belief, the unit does not use sharp blades. Instead, it relies on a spinning plate and impellers that push waste against a grinding ring.
Key Components Explained
To make things clearer, here are the main parts involved:
Motor: Powers the entire unit and rotates the internal plate
Flywheel (Turntable): Spins to move food waste around
Impellers: Small lugs that push waste outward for grinding
Grinding Ring: Stationary surface that breaks down food
Drain Chamber: Allows processed waste to exit into pipes
Because these components work together in a compact space, even a small obstruction can affect performance. Therefore, understanding their role helps you pinpoint the root cause of many issues.
Types of Garbage Disposals
Although most units look similar, there are two main types:
Continuous Feed Disposal
This is the most common type. It runs as long as the switch is on, allowing you to add waste continuously. Because of its convenience, it is widely used in homes.
Batch Feed Disposal
This type only operates when a special lid is in place. While it is slightly safer, it is less common due to limited capacity and slower operation.
Knowing your disposal type is useful, especially when troubleshooting power or operation issues.
Safety Comes First: Essential Precautions
When dealing with any electrical appliance connected to water, safety should always be the top priority. Although many repairs are simple, ignoring basic precautions can lead to serious injury.
Disconnect Power Before Anything Else
You can do this by unplugging the unit or switching off the circuit breaker. Even if the disposal seems inactive, it may still carry electrical current.
Never Use Your Hands Inside
It might be tempting to remove debris manually, but this is extremely dangerous. Instead, use tools such as pliers or tongs to extract any visible objects. Even when the unit is off, sharp internal components can cause harm.
Use Proper Tools and Lighting
Working blindly increases risk. Therefore, always use a flashlight to inspect the interior. Additionally, keep the right tools nearby, such as an Allen wrench, screwdriver, and protective gloves.
Let the Motor Cool Down
If the unit has been running and suddenly stops, it may be overheated. In such cases, wait a few minutes before attempting any fix.
By following these precautions, you create a safe environment for troubleshooting. As a result, you can focus on solving the problem without unnecessary risks.
Common Signs That Indicate a Problem

Not all disposal issues appear the same. In fact, different symptoms often point to specific underlying problems. Recognisingg these signs early can save time and prevent further damage.
No Sound at All
If the unit does not respond when switched on, the issue is likely electrical. This could involve a tripped breaker, a faulty switch, or a disconnected plug.
Humming Noise Without Grinding
This is a very common issue where the motor continues to run, but the flywheel fails to move. Usually, this happens due to a jam caused by hard objects or food buildup.
Slow Drainage
When water drains slowly, the problem is often a clog in the pipes rather than the disposal itself. However, food residue inside the unit can also contribute to blockage.
Leaking Water
Leaks can occur from different points, including the sink flange, dishwasher connection, or drain pipe. Each location indicates a different cause, which we will cover in detail later.
Unusual Noises
Grinding metal sounds or rattling noises usually mean that a foreign object has entered the chamber. Items like utensils or small bones can disrupt normal operation.
Frequent Resets
If you find yourself pressing the reset button repeatedly, the motor may be under stress. This could indicate a deeper mechanical or electrical issue.
Understanding these warning signs allows you to act quickly. Consequently, you can prevent minor issues from turning into major repairs.
Why Garbage Disposal Problems Happen
To fix a problem effectively, it is important to understand why it occurred in the first place. Most disposal issues are not random; instead, they result from specific usage habits or maintenance gaps.
Improper Waste Disposal
Certain materials should never go into a disposal. For example, grease, fibrous vegetables, coffee grounds, and large bones can cause clogs or jams. Over time, these materials build up and restrict movement.
Overloading the Unit
Although disposals are designed to handle food waste, they have limits. Adding too much waste at once can overwhelm the motor and lead to stalling.
Lack of Regular Cleaning
Without proper cleaning, residue accumulates inside the chamber. This not only causes odours but also affects performance. Therefore, regular maintenance is essential.
Wear and Tear
Like any appliance, disposals have a lifespan. Components such as the motor and seals can degrade over time. As a result, older units are more prone to leaks and failures.
Incorrect Installation
In some cases, problems begin right after installation. Loose connections, improper alignment, or poor sealing can lead to leaks and operational issues.
By identifying these causes, you can not only fix current issues but also avoid future ones. Prevention, after all, is always better than repair.
Transitioning to Hands-On Repair
Now that you understand how the system works and what can go wrong, the next step is practical action. In the following section, we will move into step-by-step repair methods that address the most common issues.
However, before proceeding, take a moment to gather your tools and ensure the unit is completely powered off. Preparation makes the repair process smoother and more efficient.
The unit again. If the problem persists, the motor itself may be failing.
Step-by-Step Garbage Disposal Repair Process
Now that you understand the system and common warning signs, it is time to move into practical repair methods. At this stage, a structured approach becomes essential because random fixes often make the problem worse. Therefore, following each step in order will help you identify the issue accurately and resolve it efficiently.
Step 1: Check the Power Supply
Before assuming a mechanical fault, always start with the basics. In many cases, the issue is not with the disposal itself but with the power source.
Start by making sure the unit is securely connected to the power source. Sometimes, vibrations during operation can loosen the connection. Next, check the wall switch to confirm it is functioning correctly. If the switch seems fine, move on to the circuit breaker.
A tripped breaker is a common cause of failure, especially after a power surge or overload. Press the reset button and then check if the unit starts working properly again. If it still does not respond, the problem may lie elsewhere.
Because electrical issues are often overlooked, addressing them early can save significant time.
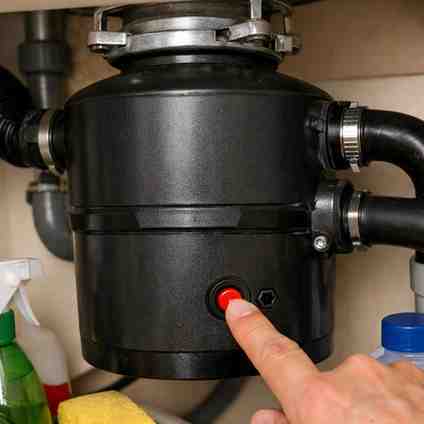
Step 2: Press the Reset Button
If the unit remains unresponsive, the next step is to locate the reset button. This small red button is usually found at the bottom of the disposal unit.
When the motor overheats or becomes overloaded, the internal safety mechanism trips automatically. As a result, the disposal shuts down to prevent damage.
Press the reset button firmly and wait for a click. After that, turn the power back on and test the unit. In many situations, this simple step restores normal operation.
However, if the button trips repeatedly, it indicates a deeper issue that requires further inspection.
Step 3: Inspect for Jams and Obstructions
If you hear a humming sound but the unit does not spin, a jam is the most likely cause. At this point, careful inspection becomes necessary.
First, disconnect the power completely. Then, use a flashlight to look inside the disposal chamber. Often, small objects such as bones, utensils, or hard food scraps get lodged between the components.
Instead of using your hands, remove visible debris with pliers or tongs. This reduces the risk of injury while ensuring precise removal.
Even if nothing is immediately visible, there may still be internal resistance. Therefore, proceed to the next step for a deeper fix.
Step 4: Use an Allen Wrench to Free the Motor
Most garbage disposals include a hex-shaped slot at the bottom. This slot allows manual rotation of the motor using an Allen wrench.
Insert the wrench into the slot and turn it back and forth. At first, you may feel resistance, which indicates a jam. However, with steady movement, the obstruction should loosen.
This process helps free the flywheel without disassembling the unit. Once the rotation becomes smooth, remove the wrench and restore power to test the disposal.
In many cases, this step resolves humming issues completely. Moreover, it prevents unnecessary replacement costs.
Step 5: Clear Internal Buildup and Residue
Even when the disposal is running, performance can decline due to internal buildup. Over time, food particles stick to the chamber walls, reducing efficiency.
To clean the unit, start by turning off the power. Then, remove the splash guard carefully. This gives you better access to the interior.
Use a brush or cleaning tool to scrub away residue. Avoid harsh chemicals, as they can damage internal components. Instead, opt for mild cleaning solutions or natural alternatives.
After cleaning, run cold water and briefly operate the unit. This helps flush out any remaining debris and restores smoother operation.
Step 6: Check and Clean the Drain Pipes
If water is draining slowly, the issue may extend beyond the disposal. In such cases, the drain pipes require attention.
Place a bucket under the sink and disconnect the P-trap. This curved pipe often collects food waste and grease. Once removed, clean it thoroughly and check for blockages.
Additionally, inspect the connecting pipes for buildup. If necessary, use a plumbing snake to clear deeper clogs.
After reassembling the pipes, run water to ensure proper flow. Improved drainage confirms that the blockage has been removed.
Fixing Specific Problems in Detail
While the step-by-step process covers general troubleshooting, some issues require targeted solutions. Therefore, understanding these scenarios will help you respond more effectively.
Garbage Disposal Not Turning On
If the unit remains completely silent, the problem is usually electrical. After checking the power supply and reset button, inspect the wiring connections.
Loose or damaged wires can interrupt the flow of electricity. In such cases, tightening connections may solve the issue. However, if the wiring appears worn or burnt, professional assistance is recommended.
Humming but Not Working
This situation indicates that the motor is active but unable to rotate. As discussed earlier, jams are the primary cause.
After clearing obstructions and using the Allen wrench, test the unit again. If the problem persists, the motor itself may be failing.
Persistent Clogging
Frequent clogs often result from improper usage habits. For example, disposing of grease or fibrous foods can create stubborn blockages.
To address this, perform a deep cleaning and ensure that only suitable waste is processed. Additionally, running cold water during operation helps move debris through the system more effectively.
Leaking Disposal
Leaks can originate from several points, and identifying the source is crucial.
Top Leak: Usually caused by a loose sink flange
Side Leak: May involve the dishwasher connection
Bottom Leak: Often indicates internal damage
Tightening connections may fix minor leaks. However, cracks or worn seals typically require replacement parts.
Transition to Advanced Troubleshooting
At this stage, most common problems should be resolved. However, if the disposal still does not function properly, the issue may involve internal components or electrical faults.
In the next part, we will explore advanced troubleshooting techniques, long-term maintenance strategies, and guidance on when to repair or replace the unit.
Read Also: Wollmatten Benefits, Uses, and Buying Tips for Sustainable Living
FAQs
What should I do if my disposal only hums?
This usually indicates a jammed motor. Turn off the power, clear any obstruction, and use an Allen wrench to free the mechanism.
Where is the reset button located?
The reset button is typically found at the bottom of the unit. It is small, red, and slightly raised.
Is it safe to repair a disposal at home?
Yes, always disconnect power before starting any repair.
How long does it take to fix common issues?
Most minor problems can be resolved within 15 to 30 minutes. However, complex repairs may take longer or require professional help.
Conclusion
Garbage disposal repair: A properly functioning disposal makes kitchen cleanup faster and more efficient. However, when problems arise, having the right knowledge can make all the difference. By understanding how the system works, recognising early warning signs, and following a structured repair process, you can handle most issues with confidence.
Moreover, consistent maintenance plays a crucial role in preventing future breakdowns. Simple habits such as using cold water, avoiding harmful materials, and cleaning regularly can extend the life of your unit significantly.
In the end, garbage disposal repair is not just about fixing problems; it is about maintaining efficiency, ensuring safety, and saving long-term costs. With the right approach, you can keep your kitchen running smoothly without unnecessary stress.