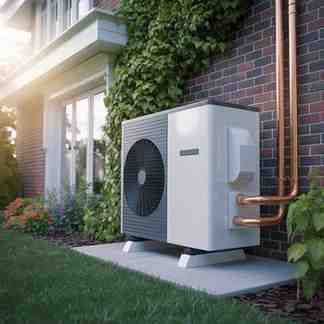
Home heating is changing rapidly. Rising energy costs and environmental concerns are pushing homeowners toward smarter solutions. As a result, heat pump installation is becoming a serious alternative to traditional boilers.
Unlike gas systems that burn fuel, a heat pump transfers heat from outside into your home. Therefore, it delivers high efficiency with lower emissions. However, successful installation depends on proper planning, not just equipment choice.
How Heat Pumps Work
Even cold air contains thermal energy, and the system extracts and concentrates that energy to warm indoor spaces.
There are two main types: air source and ground source systems. Air source units are more common because they are easier to install. Meanwhile, ground source systems offer stable performance but require excavation. Since heat pumps operate at lower temperatures than boilers, good insulation becomes essential for efficiency.
Is Your Home Ready?
Before moving forward with heat pump installation, your property must be carefully assessed. Proper evaluation prevents performance issues later.
Insulation and Thermal Performance
Heat pumps provide steady warmth instead of intense bursts of heat. Therefore, homes that lose heat quickly may struggle without upgrades.
Loft insulation, wall insulation, and high-quality glazing significantly improve efficiency. Moreover, reducing heat loss lowers long-term operating costs. In many cases, improving insulation before installation delivers better overall results.
Heat Loss Calculation
Professional installers conduct detailed heat loss calculations for each room. This step determines the exact heating demand during the coldest days of the year.
Without accurate sizing, performance suffers. An undersized unit may fail to maintain comfort. Conversely, an oversized system may cycle inefficiently. Consequently, precise measurement is essential for system reliability.

Heating System Compatibility
Since heat pumps operate at lower temperatures, existing radiators must be reviewed. Larger radiators or underfloor heating systems distribute warmth more effectively.
However, complete replacement is not always necessary. Often, only certain radiators need upgrading. Therefore, professional assessment helps control costs while maintaining efficiency.
Outdoor Space and Placement
Air source units require sufficient airflow and proper spacing. Placement must consider accessibility, ventilation clearance, and local regulations.
Modern systems are relatively quiet. Nevertheless, thoughtful positioning ensures minimal disturbance. Ground source systems, on the other hand, require significant outdoor space for trenching or boreholes.
Planning Before Installation Begins
Many homeowners focus only on installation day. However, the planning stage determines long-term success.
Choosing the Right System
The choice between air and ground source systems depends on land availability, climate, and budget. Air systems are typically faster and more affordable to install. In contrast, ground systems involve higher upfront costs but can deliver strong seasonal efficiency.
Selecting the correct system requires balancing performance expectations with financial planning. Therefore, professional guidance is highly recommended.
Electrical Requirements
Because heat pumps rely entirely on electricity, the property’s electrical capacity must be evaluated. Some homes may require minor upgrades to the consumer unit.
Planning these adjustments early prevents unexpected delays. Additionally, proper electrical integration ensures safe and stable operation.
Hot Water Storage Considerations
Unlike combi boilers, most heat pumps work with a dedicated hot water cylinder. As a result, sufficient indoor space must be allocated.
Early planning allows homeowners to prepare a utility area or airing cupboard if needed. Consequently, installation becomes smoother and more efficient.
Creating a Strong Foundation
Ultimately, heat pump installation is not simply about replacing a heating unit. It is about designing an integrated energy system tailored to your home.
When insulation is optimised, heat loss is accurately calculated, and system sizing is precise, performance improves significantly. Moreover, long-term energy savings become more predictable.
By preparing properly before installation begins, homeowners reduce risk, improve efficiency, and create a future-ready heating solution.
Step-by-Step Heat Pump Installation Process
Pre-Installation Preparation
Before any equipment arrives, preparation work begins. Although this phase is less visible, it directly influences installation efficiency.
First, the installer confirms the final system design based on the earlier heat loss survey. Pipe routes, electrical connections, and cylinder placement are reviewed. If insulation upgrades were recommended, they should already be completed at this stage.
In addition, delivery logistics are scheduled. Heat pumps, cylinders, mounting brackets, and control systems are prepared in advance. Therefore, when installation day begins, delays are minimised.
Step 1: Removing the Existing Heating System
If the property previously relied on a gas or oil boiler, that unit is carefully disconnected and removed.
Engineers isolate the gas or fuel supply, drain the existing heating circuit, and disconnect pipework. Safety procedures are followed throughout this stage to prevent leaks or system damage.
However, not every installation requires full system removal. In hybrid setups, parts of the existing system may remain integrated. Consequently, the approach depends on the chosen configuration.
Step 2: Installing the Outdoor Unit
For air source systems, the outdoor unit is positioned first.
Installers secure the unit either on a ground-mounted frame or a wall bracket. The location must provide unrestricted airflow, stable support, and adequate clearance from boundaries. Moreover, vibration-dampening mounts are typically used to reduce sound transmission.
Proper placement is critical. If airflow becomes restricted, system efficiency declines. Therefore, spacing guidelines are strictly followed.
For ground source systems, this stage involves either trench excavation for horizontal loops or drilling boreholes for vertical loops.
Step 3: Fitting the Indoor Components
Once the external unit is secured, attention shifts indoors.
A hot water cylinder, buffer tank (if required), and hydraulic components are installed in the designated location. Pipework connections are carefully routed between the indoor and outdoor units.
Additionally, circulation pumps, expansion vessels, and safety valves are fitted. Each component plays a specific role in maintaining pressure stability and heat transfer efficiency.
Since space planning was completed earlier, this stage typically progresses smoothly. However, precision remains essential to ensure long-term reliability.
Step 4: Upgrading Radiators or Heating Distribution
If the heat loss assessment identified radiator upgrades, they are installed during this phase.
Larger radiators may replace smaller ones to ensure adequate heat output at lower flow temperatures. Alternatively, underfloor heating circuits may be integrated or expanded.
Importantly, installers balance the system to ensure even heat distribution across all rooms. Without proper balancing, some areas may feel warmer than others. Therefore, hydraulic adjustment is a crucial technical step.
Step 5: Electrical Integration and Controls
Because heat pumps operate entirely on electricity, electrical integration is a key stage of heat pump installation.
Qualified electricians connect the system to the consumer unit. In some cases, a dedicated circuit breaker is installed for safety and load management.
Smart thermostats and weather compensation controls are also configured. These controls adjust output based on external temperature changes. As a result, the system operates more efficiently and maintains stable indoor comfort.
Furthermore, internet-enabled controls allow remote monitoring and adjustment. This feature improves user convenience while optimising performance.
Step 6: Pressure Testing and System Flushing
Before commissioning, the entire hydraulic system undergoes pressure testing.
Engineers check for leaks, secure fittings, and verify system integrity. Afterwards, the pipework is flushed to remove debris or contaminants. This cleaning process protects internal components and prevents blockages.
Skipping this step can reduce efficiency and damage equipment over time. Therefore, professional installers treat this stage with careful attention.
Step 7: Commissioning and Calibration
Commissioning is the most technical stage of heat pump installation.
During this phase, engineers activate the system and configure operational parameters. Flow temperatures, pump speeds, and control settings are adjusted according to manufacturer specifications.
Additionally, the system is monitored under load conditions to verify performance. Temperature differentials are measured, and efficiency readings are recorded.
This process ensures the system operates exactly as designed. Without proper commissioning, even high-quality equipment may underperform.
What to Expect During Installation

For most residential properties, installation takes between two and five days. However, complex ground source systems may require additional time due to excavation work.
Temporary heating solutions can be arranged if installation occurs during colder months. Although minor disruption is unavoidable, professional teams aim to minimise inconvenience.
Noise levels during installation are moderate and short-term. Once completed, operational noise from modern units is typically low and regulated.
Quality Assurance and Handover
After commissioning, the installer provides a full system demonstration.
Homeowners receive guidance on thermostat use, hot water scheduling, and maintenance requirements. In addition, warranty documentation and compliance certificates are issued.
Understanding system operation is important. Since heat pumps function differently from traditional boilers, small behavioural adjustments may improve efficiency.
Therefore, clear handover training enhances long-term satisfaction.
Why Professional Expertise Matters
Heat pump installation involves refrigeration handling, hydraulic engineering, electrical integration, and regulatory compliance. Consequently, expertise is non-negotiable.
Certified installers follow industry standards and manufacturer guidelines. Moreover, professional installation protects warranty coverage and ensures safety.
Attempting shortcuts can lead to performance issues, higher energy bills, or equipment damage. Therefore, choosing experienced professionals remains one of the most important decisions in the process.
Investment and Installation Costs
When evaluating heat pump installation, upfront cost is usually the first concern. Although the initial investment can be higher than replacing a traditional boiler, the total expense depends on multiple factors such as property size, insulation condition, radiator upgrades, electrical adjustments, and system type. Air source systems generally require lower installation budgets compared to ground source systems, which involve excavation or drilling.
However, focusing only on initial pricing can create a narrow perspective. A heat pump should be viewed as a long-term infrastructure improvement rather than a short-term appliance purchase. Over time, improved efficiency and reduced energy waste contribute to measurable savings. Additionally, many regions offer financial incentives or grants that significantly reduce installation costs, making the investment more accessible.
Running Costs and Energy Efficiency
One of the primary advantages of heat pump installation is operational efficiency. Unlike combustion-based systems, heat pumps transfer heat instead of generating it, which allows them to deliver multiple units of heat for every unit of electricity consumed. Consequently, overall energy usage becomes more predictable and often lower than conventional systems.
Nevertheless, actual savings depend on insulation quality, correct system sizing, electricity pricing, and usage habits. A well-designed system in a thermally efficient home performs substantially better than one installed without proper planning. Therefore, efficiency is not automatic; it is achieved through accurate design, professional installation, and informed homeowner operation.
Maintenance and System Lifespan
Although heat pumps contain advanced technology, their maintenance requirements are relatively straightforward. Annual servicing typically includes refrigerant checks, electrical inspections, pressure verification, and filter cleaning. Because there is no fuel combustion, internal wear and carbon buildup are significantly reduced compared to gas or oil boilers.
With proper servicing, most systems are designed to operate efficiently for 15 to 20 years. This extended lifespan enhances long-term value and reduces replacement frequency. Therefore, consistent maintenance not only protects performance but also maximises return on investment over time.
Common Mistakes to Avoid
One of the most frequent errors is installing a heat pump without improving insulation first. Since heat pumps provide steady warmth rather than intense bursts of heat, poorly insulated homes may struggle to maintain comfort. Consequently, skipping insulation upgrades can reduce efficiency and increase electricity consumption.
Another common mistake involves incorrect system sizing or choosing installers based solely on price. An oversized or undersized unit compromises performance, while poor commissioning can limit efficiency. Therefore, selecting experienced professionals and relying on accurate heat loss calculations remains essential for long-term success.
Environmental Impact and Property Value
Beyond financial considerations, heat pump installation significantly reduces direct carbon emissions. Because the system relies on electricity rather than fossil fuel combustion, it supports long-term sustainability goals. Moreover, as national electricity grids increasingly integrate renewable energy sources, environmental benefits continue to grow.
In addition, energy-efficient heating systems enhance property appeal in competitive housing markets. Buyers are increasingly aware of operating costs and environmental performance. Therefore, installing a heat pump not only improves comfort but may also strengthen resale value and future market positioning.
Read Also: PCOS Belly Explained: Why It Happens and What Actually Helps
Conclusion
Heat pump installation represents more than a technological upgrade; it reflects a strategic shift toward energy efficiency and long-term resilience. From planning and system design to commissioning and maintenance, each stage plays a crucial role in overall performance.
When approached with preparation and professional expertise, the outcome is consistent comfort, predictable operating costs, and reduced environmental impact. In an era defined by rising energy awareness, heat pumps offer a practical and forward-looking solution for homeowners ready to invest in sustainable living.
FAQs
1. How long does heat pump installation take?
Most air source heat pump installations take 2–5 days. Ground source systems may take longer due to excavation work.
2. What is the average cost of heat pump installation?
Costs vary based on system type, property size, and upgrades required. Air source systems are generally more affordable than ground source systems.
3. Do I need to upgrade my radiators for a heat pump?
Not always. Some homes require larger radiators, while others only need minor adjustments after a professional heat loss assessment.
4. Are heat pumps energy efficient?
Yes. Heat pumps can deliver three to four units of heat for every unit of electricity used, making them highly efficient.
5. Is heat pump installation suitable for older homes?
Yes, but insulation improvements may be necessary to maximise performance and efficiency.